
QUICK TIPS
WE MAY ASK YOU TO DO A TIMED CLAP AT THE BEGINNING OF YOUR VIDEO: CHECK THE INSTRUCTIONS AT THE RECORDING PORTAL FOR YOUR TRACK
FOR YOUR VIDEO, THE PHONE MUST BE SIDEWAYS( LANDSCAPE) NOT UPRIGHT
USE A STAND OR TABLE ETC. HAND-HELD VIDEOS ALWAYS SHAKE!
CHECK THE LIGHTING ON YOUR SHOT AND MAKE SURE THAT YOU ARE IN THE CENTRE OF IT
DON”T COVER YOUR FACE WITH YOUR SCORE
WHAT OR WHO IS BEHIND YOU? ( Hello Mum!!)
HOLD STILL FOR A FEW MOMENTS AT THE END
Advice From Neil…
Recording our own voice as audio alone or us singing as video with the audio is not something that we are used to. Many of us feel uncomfortable when we head our own voice played back as we are afraid of hearing errors in pitch, timing, voice tone and other qualities of our voices. This great article explains a lot – you are not alone! Live Science – Why do people hate the sound of their own voice?
We are also not used to using the setting up and using the equipment well. I have gone through three different devices and ways to set up and have ended up improving my kit to do so. So here are a few detailed guides, but below I have a few photos of how I am using the guidance for better results.
Making Music Resource – Recording Audio At Home
Making Music – Recording Video at Home
VirtualChoir101.com Video Tips for Singers
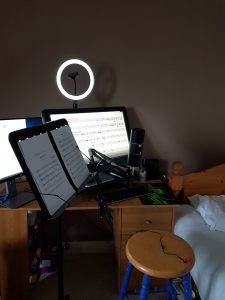
My setup
 I
I
Video – Mobile phone or Webcam on PC monitor or External USB Webcam
Audio – Mobile phone or external mic
Software – Audacity for Audio (free), computer camera app or mobile phone for video with audio
Desk clamp anglepoise mic stand
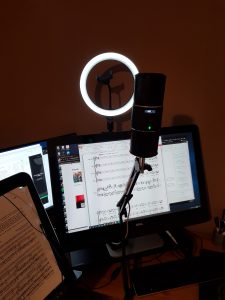
Ring Fill Light on Stand
Music stand (though I mostly display the scores as pdf at the top of my screen just below the webcam so my eyes look towards the camera…)
If you hold your video recording device, it shakes and distorts the audio and the video. So, I moved to using a webcam on my Computer. The computer is an all-in-one, but many monitors also have a webcam at the top of the screen surround. I am tall, so I had to raise the computer up. At times, I also prop it up even higher.
I found that the light in the room meant my face was too dark for videos, so I got a little circular USB light on a stand and that works really well. Avoid taking video with a window or light behind you. During the day, if the light is in your face, that may be bright enough. Otherwise use an anglepoise lamp or USB light in to shine in your face.
For my audio, I had bad early issues. I had ‘borrowed’ a USB, external mic from one of my sons (USB mics are great as they tend to be better quality than your device mic) but it was so far down below me on the desk as I stood that the audio was drowned by background noise. I played with a propped-up mobile phone on my music stand, but in the end I had to get an anglepoise type of mic stand. You could use a mic floor stand or one like in the picture that clips onto a desk. It means I can lift it up and it stays steady when I stand. You can see a holder in the middle of the circular USB light that could hold you phone for audio / video recording or webcam for audio instead if you don’t have or want to get an external USB mic. I have to say that the external USB mic is fabulous, if sensitive, and has made a big difference to my audio. I plan to add an external webcam and clip it to the raised ring-light, so I can stand, sing and video.
Read the guides, use what you have and move yourself and the kit around till you get better audio and visual. If you feel you still could do better, read the guides again to see what you may have missed, but maybe you need some of the kit above. External mics can be expensive (The Razer gaming one above wasn’t cheap, nor was Gareth’s Blue Yeti and webcams at High Def can also cost, but you can get reasonably priced ones too. The stands and light are not expensive and easily available online.
I hope this helps and you enjoyed the little read about my own struggles….first world problems!
Neil